Getting the Most Out of MLOps with ZenML: 2
Step by step guide on deploying ZenML server and working with ZenML client CLI

I'm Fares Hasan, a passionate Data Scientist with a track record of driving innovation in machine learning and data analytics. As a seasoned leader, I thrive on building high-performing teams and implementing cutting-edge solutions that solve complex business challenges. With expertise in technical data science, machine learning, and data infrastructure, I'm dedicated to fostering a culture of growth, collaboration, and excellence. I'm also deeply passionate about Semantic Search and, in my spare time, have been exploring the frontiers of AI through the development of a Retrieval Augmented Generation (RAG) system. Let's connect to explore opportunities at the intersection of data, AI, and innovation.
Intro
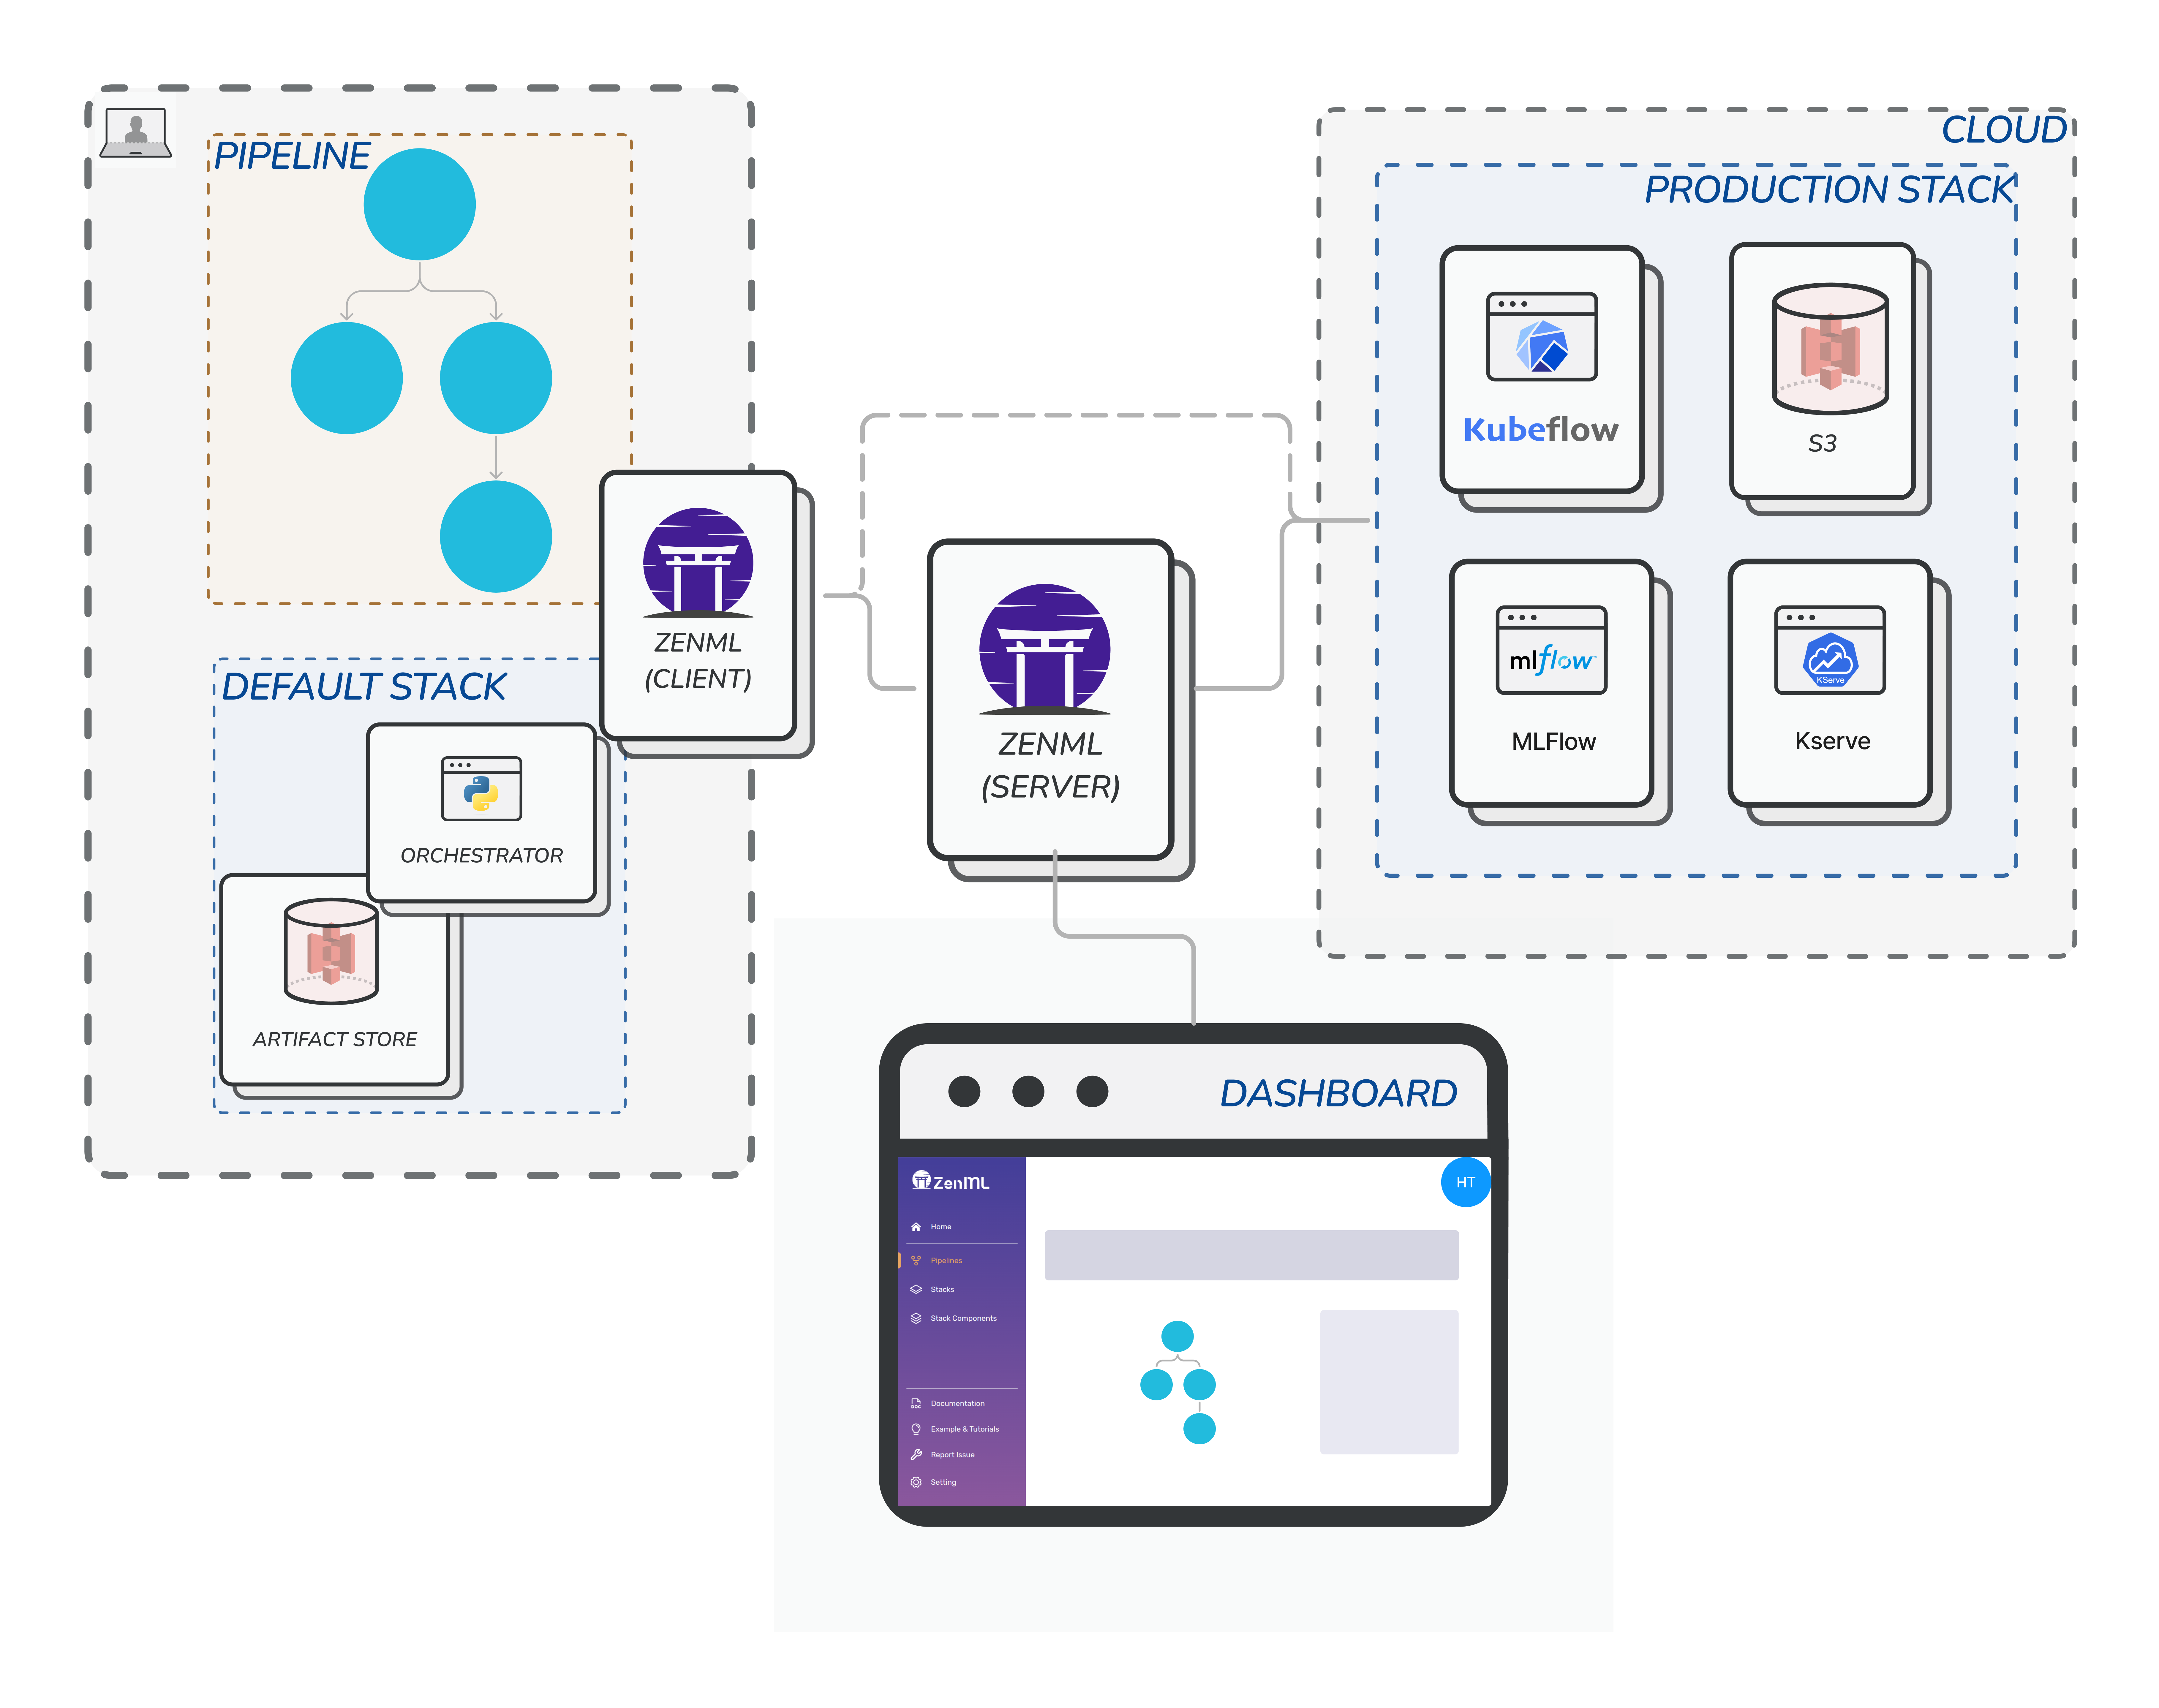
To work with ZenML there are two sides we need to create. If you are an ML engineer the ZenML server deployment would be your task and you will have to do it once. For users like data scientists who will use ZenML and or ML engineers who are building ML workflows, they will use the ZenML client. In this article we will focus first in the ZenML server and how you can deploy it. The diagram above by ZenML illustrates the architecture nicely.

The ZenML server will have a dashboard to visualize your entire MLOps ecosystem. There you can see reports on pipeline runs and failures, the stacks and components registered and it will also give information about who from your team owns the pipeline.
How to install it?
You can simply spin up a ZenML server by running the following command:
docker run -it -d -p 80:80 --name zenml zenmldocker/zenml-server
This will run a docker container with local SQLite database. This is fine to experiment with but zenml team recommends using MYSQL for production. If you want a product grade you have to also improve command by specifying the zenml server image version and it's highly recommended to use a similar version for the server and the zenml client.
Docker deployment
docker run -it -d -p 8080:8080 --name zenml \
    --env ZENML_STORE_URL=mysql://username:password@host/zenmldb \
    zenmldocker/zenml-server:0.35.1
Deployment with docker compose
You can run both zenml server and MySQL database containers using the docker compose. Create a file name docker-compose.yml and past the following to it:
version: "3.9"

services:
  mysql:
    container_name: mysql_zenml
    restart: always
    image: mysql:8.0
    ports:
      - 3306:3306
    environment:
      - MYSQL_ROOT_PASSWORD=password
    volumes:
      - "$PWD/mysql-data:/var/lib/mysql"
  zenml:
    container_name: zenml_server
    image: zenmldocker/zenml-server:0.35.1
    ports:
      - "8080:8080" #zenml dashboard
    environment:
      - ZENML_STORE_URL=mysql://root:password@host.docker.internal/zenml
      - ZENML_DEFAULT_USER_NAME=admin
      - ZENML_DEFAULT_USER_PASSWORD=zenml
    links:
      - mysql
    depends_on:
      - mysql
    extra_hosts:
      - "host.docker.internal:host-gateway"
    restart: on-failure
For other deployment options you can follow from Deploying ZenML Documentation
You can simply launch this with the command:
docker-compose up -d
This will start up your zenml server with MySQL database. You can open the localhost in the browser or the IP address of your EC2 to see the dashboard. Remember the credentials username, password and change them to something more secure. If you have used the docker deployment -it's my current implementation- the user name will be default and leave the password empty
Yup that's it you have made your zenml server deployment go live!!
ZenML Client CLI
ZenML client is our main way of communicating with the server -ZenML server and dashboard-. This client will help us create mlops stacks and share them with our team and or execute certain pipelines locally before pushing them to production.
First: Install
The first thing we should do as best practice is to install ZenML client version that is similar to our ZenML server. If you have been following closely you will see that our server is using version 0.35.1 we should stick to that version when it comes to using the client. Don't forget to create a virtualenv for this project.
pip install zenml==0.35.1
Second: Connect
Once you have installed the ZenML client its time to connect with zenml server.
zenml connect --url=http://my-server-address:8080/ --username=default
Be aware that my user name is default because I used the docker deployment above. If you used the docker-compose you will use a different username.
Third: well maybe check the status
Status: zenml status will show you the current status with information that you may want to know and it looks like this:
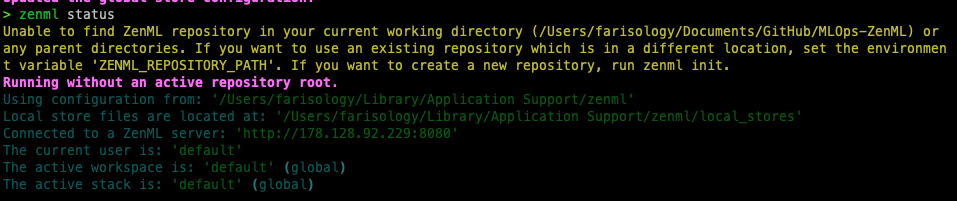
As you see my client is connected to ZenML server that we deployed earlier and there is no stack other than the default stack which is currently active.
Summary
That was a step-by-step guide on how to install and deploy the ZenML server and use the ZenML client CLI. The ZenML server comes with a dashboard that visualizes the entire MLOps ecosystem and reports on pipeline runs and failures, while the ZenML client allows for the creation of MLOps stacks, execution of pipelines and sharing of stacks with a team. ZenML's extensibility makes it easy to scale ML models efficiently and effectively. Try it out for yourself by following the simple installation and deployment steps. In the next article we will build a simple use case to demo execution.
Reading more
I think ZenML has an amazing documentation and I encourage you to read more there for other aspects that are not covered here:
Deploying ZenML: https://docs.zenml.io/getting-started/deploying-zenml
ZenML dashboard and connection https://docs.zenml.io/v/0.35.1/starter-guide/pipelines/dashboard
Troubleshooting: https://docs.zenml.io/getting-started/deploying-zenml/troubleshooting