Getting the Most Out of MLOps with ZenML: 4
Streamline MLOps Workflows with ZenML: Harnessing the Power of Stacks for Efficient Machine Learning Operations

I'm Fares Hasan, a passionate Data Scientist with a track record of driving innovation in machine learning and data analytics. As a seasoned leader, I thrive on building high-performing teams and implementing cutting-edge solutions that solve complex business challenges. With expertise in technical data science, machine learning, and data infrastructure, I'm dedicated to fostering a culture of growth, collaboration, and excellence. I'm also deeply passionate about Semantic Search and, in my spare time, have been exploring the frontiers of AI through the development of a Retrieval Augmented Generation (RAG) system. Let's connect to explore opportunities at the intersection of data, AI, and innovation.
Recap
ZenML Steps:
ZenML steps are the building blocks of ML workflows.
Each step represents a specific task or transformation in the ML pipeline.
Steps can include tasks like importing data, preprocessing data, training models, or evaluating models.
ZenML provides a set of built-in steps, and you can also create custom steps tailored to your specific needs.
ZenML Pipelines:
ZenML pipelines define the sequence and dependencies of steps in an ML workflow.
Pipelines connect and orchestrate the steps, creating a cohesive end-to-end process.
Pipelines ensure that the steps are executed in the correct order, with inputs and outputs adequately connected.
ZenML pipelines make creating scalable, reproducible, and maintainable ML workflows easy.
Building ML Workflows with ZenML:
To construct an ML workflow with ZenML, you define and configure the steps required for your specific task. (see article 3 in this series)
Each step can be customized with specific parameters and configurations.
Steps can be added, modified, or removed to adapt the workflow as needed.
The sequence of steps and their dependencies are defined in the pipeline, ensuring the proper execution order.
ZenML provides a streamlined way to create, manage, and execute ML workflows, promoting best practices and standardization.
Stacks
ZenML stacks are intuitively MLOps stacks which you can think of as the underlying infrastructure that you operate your pipeline on. There has been a time when people built machine learning models into production before the term MLOps and if we looked at what they needed to do that we can think minimally of the following components:
Orchestrator (Airflow, Kubeflow)
Artefacts store (S3, GCS)
Tracking (MLflow)
Those were the minimal setup that we used to operate our ML pipelines with. In the ZenML context, these three components together make up what you can call a stack. Of course, different use cases might require more components that you can add to your stack.
ZenML allows you to create different stacks which empower you to have separate environments for your ML pipelines like local, staging, and prod. This also means you can have stacks that are based on different cloud providers too. The possibilities with ZenML are only limited by your imagination.
Creating ZenML Stack
In the previous article, we executed our run.py file which has the non-fatty liver pipeline. That execution has been operated by the default stack which zenml creates for you automatically. The default stack is local and all its components are also local. The executor and the artefacts store are both local and if we look at the runs record in our ZenML dashboard we can see that each artefact is stored in a local directory.
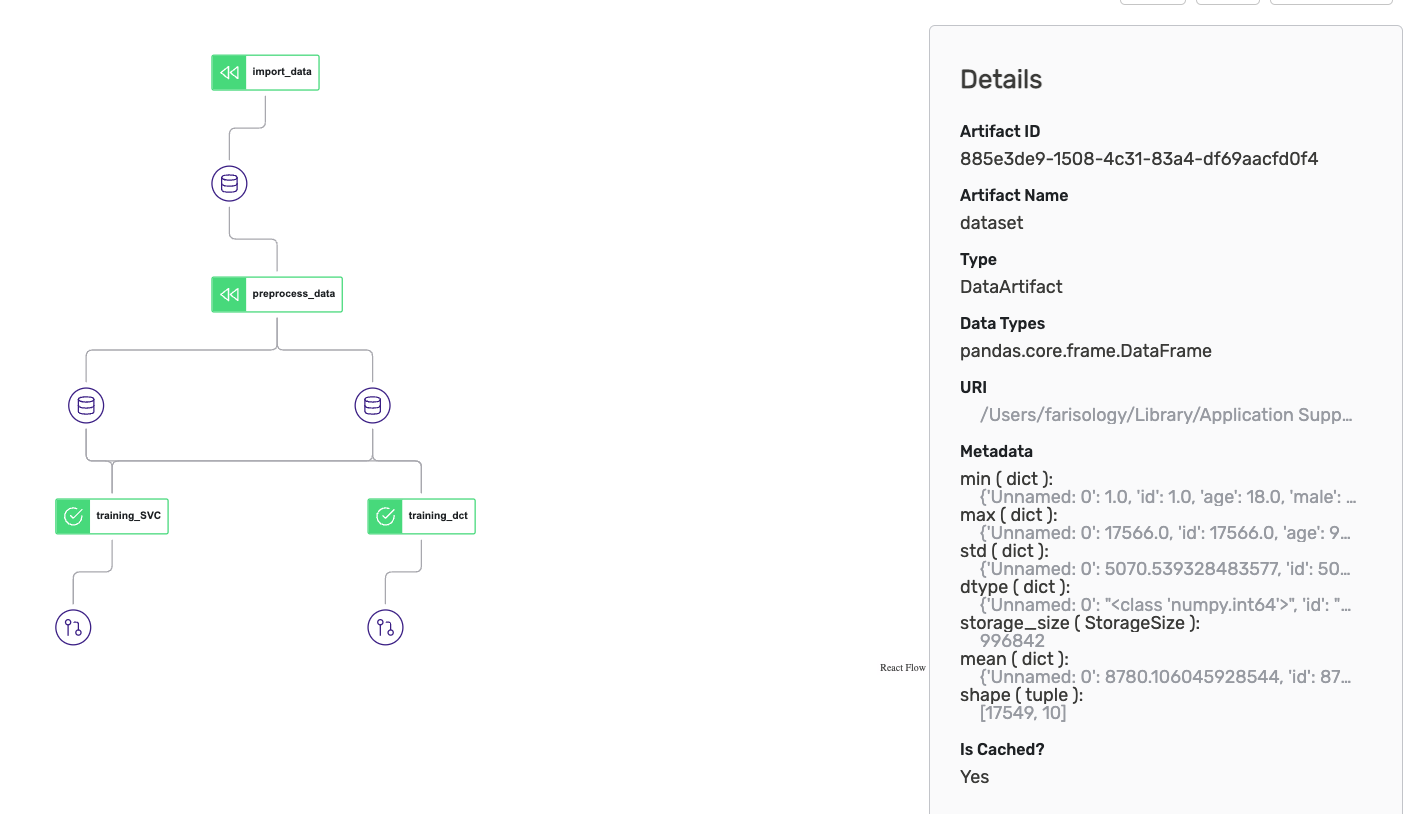
If we clicked on any of the database symbols and looked at the details view we would see that the URI is a local destination. If we used a remote artefacts store like S3 all exported artefacts will be versioned and stored to the S3 bucket.
Let's simulate creating a production stack with the following components (this is more of a simulation, actual prod will require more components depending on your requirements):
Orchestrator: Airflow
Artefacts store: S3 bucket
Container registry: ECR
Image builder: Local docker
Connect to server
Connecting to the server is the first step that we should perform so that all our work is recorded and can be viewed from the ZenML dashboard. We have deployed our ZenML server in the second article of this series using a docker-compose file which makes it easy to replicate.
I prefer that you deploy your ZenML server (to the cloud, you can get $200 from digital ocean upon signup) to keep your server and ZenML client in two different devices at least.
To connect we use the following command (username is admin as per our deployment file, password will be requested):
zenml connect --url=zenml_deployment:80/ --username=admin
Installing ZenML Integrations
To create our stack components we need to install some integrations. First, you may want to observe what integrations are pre-installed. Use this command:
zenml integration list
This will give you a table with all integrations and an indicator if the integration is installed. To install our required integrations we use the following commands:
# to use S3 as our artefacts store later
zenml integration install s3 -y

# to use airflow as our orchestrator
zenml integration install airflow
So far we have installed the integrations we need, but this doesn't mean our zenml can use them yet. We have to register these into ZenML components.
Create ZenML components
The components we need are the orchestrator, artefacts store, and container registry. We go about the registration using the simple commands as follows:
zenml orchestrator register <ORCHESTRATOR_NAME> --flavor=airflow --local=True --share
My orchestrator is registered as rairflow that is to say it's a remote airflow. Observe how the local flag is False and there is a share flag which to make this orchestrator available to my team and they can use it in their own stack:
zenml orchestrator register rairflow --flavor=airflow --local=False --share
My artefacts store is registered like this:
zenml artifact-store register s3_store -f s3 --path=s3://zenml-mlops --share
My container registry is registered like this:
zenml container-registry register aws_ecr --flavor=aws --uri=<REGISTRY_URI> --share
You should name your ecr repository zenml that just makes things easier for you while following up our steps here.
Local image builder registered like this:
zenml image-builder register local_imb --flavor=local --share
Register ZenML stack
Now we have all the components and integrations we need to create our stack. The process is simple we need a name for the stack and the rest should be familiar to you now:
zenml stack register remote_flow_stack --orchestrator rairflow \
        --artifacts-store s3-store \
        -c ecr_zenml \
        -i local_imb--share
That will register our stack and we can see that a stack is added to our zenml server dashboard.

Activating ZenML Stack
Our stack is registered but it's not the active stack and there are also two details to get this stack working.
Login for AWS ECR:
# Fill your REGISTRY_URI and REGION in the placeholders in the following command.
# You can find the REGION as part of your REGISTRY_URI: `<ACCOUNT_ID>.dkr.ecr.<REGION>.amazonaws.com`
aws ecr get-login-password --region <REGION> | docker login --username AWS --password-stdin <REGISTRY_URI>
Activation of our stack This step is important so our ZenML client can push the image of our pipeline into ECR. Then airflow is going to run a dag based on that image. Now let's activate our stack:
zenml stack set remote_flow_stack
Describe the stack maybe you want to look at the configurations of a certain stack. This can be done in ZenML client by simply using the describe command like this:
zenml stack describe remote_flow_stack
For our current stack, it looks like this:

That's pretty much it. You can see what stacks are in your environment using the following command:
zenml stack list
Running our pipeline in the remote stack
Our Python file that operates the pipeline looks like this (refer to the code in our third article):
from zenml.config.schedule import Schedule
from pipelines.nfld_pipeline import training_nfld_model
from steps.nfld_steps import (import_data, preprocess_data,
                              training_SVC, training_dct
                              )


def main():
    # init and run the nfdl classifier training pipeline
    run_nfdl_training = training_nfld_model(
        import_data=import_data(),
        preprocess_data=preprocess_data(),
        training_SVC=training_SVC(),
        training_dct=training_dct()
    )

    run_nfdl_training.run()


if __name__ == "__main__":
    main()
We need to modify it a bit to suit the remote stack this pipeline should run on. The modifications are minor and the new file (I create a new Python module just to keep them clean) looks like this:
import os
from zenml.config.schedule import Schedule
from pipelines.nfld_pipeline import training_nfld_model
from zenml.integrations.airflow.flavors.airflow_orchestrator_flavor import AirflowOrchestratorSettings
from steps.nfld_steps import (import_data, preprocess_data,
                              training_SVC, training_dct
                              )

airflow_settings = AirflowOrchestratorSettings(
    operator="docker",  # or "kubernetes_pod"
    dag_output_dir=f"{os.getcwd()}/zipped_pipelines", #use your directory path to the zipped_pipes directory
    dag_id="non_fatty_liver_training",
    dag_tags=["zenml", "MLOPS", "Training"],
)

def main():
    # init and run the nfdl classifier training pipeline
    schedule = Schedule(cron_expression="5-15 * * * *")
    run_nfdl_training = training_nfld_model(
        import_data=import_data(),
        preprocess_data=preprocess_data(),
        training_SVC=training_SVC(),
        training_dct=training_dct()
    )

    run_nfdl_training.run(settings={"orchestrator.airflow": airflow_settings}, schedule=schedule)


if __name__ == "__main__":
    main()
The airflow_settings help us set multiple parameters for our airflow dag and we added a cron scheduler expression to set the running interval. Now if you run this file the output will not be an execution of the code. The output of running this file - with our remote stack being the active stack - will be an image in our aws ECR + a zip file in our zipped_pipelines directory.
Using GitOps you could run the file in a pipeline and transfer this zip file into the remote airflow of your deployment. That is how it should be done and you have freedom to orchestrate this on your prefered method.
Running our pipeline in a local stack
To run locally we need to create a local stack and now this should be simple we just need to do a few things differently and create a local stack. The steps along with commands are as follows:
Install the docker operator for airflow:
pip install apache-airflow-providers-docker
We need to register a local airflow orchestrator because we want to run this locally:
zenml orchestrator register lairflow --flavor=airflow --local=True --share
Register a stack using our local airflow orchestrator and the same components we used before for artefacts store and image registry .. etc:
zenml stack register local_flow_stack --orchestrator lairflow --artifact-store s3_store -c ecr_zenml -i local_imb --share
Now this stack is registered you should set it as the active stack:
zenml stack set local_flow_stack
Now you can provision the stack which will spin up a local airflow for you:
zenml stack up
The output message of executing this command will give you credentials to log in to the airflow UI. Use generated credentials to log in and observe later how your pipeline is executed locally. This will be helpful when you are debugging or testing your pipeline before deploying it to run in the production stack.
This local airflow stack provisioning will be deprecated in the future according to ZenML new update. Be aware that in the near future running local airflow orchestrator will be different.
Running the pipeline locally is an easy process (similar to running a remote stack) with minor changes to the run script. The output will be a DAG file stored in the directory of airflow dags locally in your machine. You can then trigger your DAG from the Airflow UI to start. The run script will be different as follows:
import os
from zenml.config.schedule import Schedule
from pipelines.nfld_pipeline import training_nfld_model
from zenml.integrations.airflow.flavors.airflow_orchestrator_flavor import AirflowOrchestratorSettings
from steps.nfld_steps import (import_data, preprocess_data,
                              training_SVC, training_dct
                              )

airflow_settings = AirflowOrchestratorSettings(
    operator="docker",  # or "kubernetes_pod"
    dag_id="non_fatty_liver_training",
    dag_tags=["zenml", "MLOPS", "Training"],
)

def main():
    # init and run the nfdl classifier training pipeline
    schedule = Schedule(cron_expression="5-15 * * * *")
    run_nfdl_training = training_nfld_model(
        import_data=import_data(),
        preprocess_data=preprocess_data(),
        training_SVC=training_SVC(),
        training_dct=training_dct()
    )

    run_nfdl_training.run(settings={"orchestrator.airflow": airflow_settings}, schedule=schedule)


if __name__ == "__main__":
    main()
The only difference in this script is the line inside the AirflowOrchestratorSettings that specify the dag output directory. This like is removed because its not helpful for our local airflow stack and we want the DAG to be generated into its respective directory.
Bring stack down
At the end of testing or debugging our stack, we want to take it down. This should be done in a way that removes everything that was created to provision the stack to avoid issues when you come to test a pipeline locally in the future. You can bring it down with the following command:
zenml stack down -f
Frequent errors
AWS ECR login might cause you issues so be aware that it's something you have to deal with.
Server disconnect, you should disconnect and connect to your server after you are done or when you want to start working with ZenML respectively. Leaving the connection active might cause some issues.
Repository
All the source code for this series is made publically available here.
Conclusion
ZenML proves to be a game-changer in managing the MLOps stack, offering a seamless experience with its local and remote stack creation capabilities. Although my created stacks lean towards familiar components like Airflow for orchestration and AWS cloud for resources, it's important to note that ZenML offers flexibility to tailor the stack to individual preferences. This article serves as a demonstration of ZenML's potential through a demo project, but it's worth highlighting that ZenML is a dynamic framework, continuously evolving with frequent updates and improvements.