The easiest way to build an API for your Machine Learning model

I'm Fares Hasan, a passionate Data Scientist with a track record of driving innovation in machine learning and data analytics. As a seasoned leader, I thrive on building high-performing teams and implementing cutting-edge solutions that solve complex business challenges. With expertise in technical data science, machine learning, and data infrastructure, I'm dedicated to fostering a culture of growth, collaboration, and excellence. I'm also deeply passionate about Semantic Search and, in my spare time, have been exploring the frontiers of AI through the development of a Retrieval Augmented Generation (RAG) system. Let's connect to explore opportunities at the intersection of data, AI, and innovation.
image from the public domain
Among the most frequent questions I get asked about is what is next after We have prepared the data and trained a model and went further to test the performance? Usually in academia we stop at this point and it’s time to put together a research paper that will hopefully get accepted with less brutal comments from reviewers. Although lately more of the academic work have been made available in which the community benefited from this and brought more enthusiasts to ticker around with these model. In the other hand there are more software engineers who get stuck and often expressed the radical candor and call machine learning useless. So, if you stuck with people practicing the academia concern of building a model that performs at 1% higher in accuracy this post would be your way to get your models up for deployment as an API.
Intention
The intention of sharing this is to demo how easy it is to actually deploy your model. In 30 lines of code your model will be ready to for scaling which I believe is as important. I don’t claim that this model or this API is production ready because it is just one step into and for sure there is more to production than just build a simple api. This demo is a simplification of how your model can take its first step. At the end of this publication I will tell you what needs to be done before you actually go live with this api.
Preface
A typical machine learning workflow will look like the diagram below:
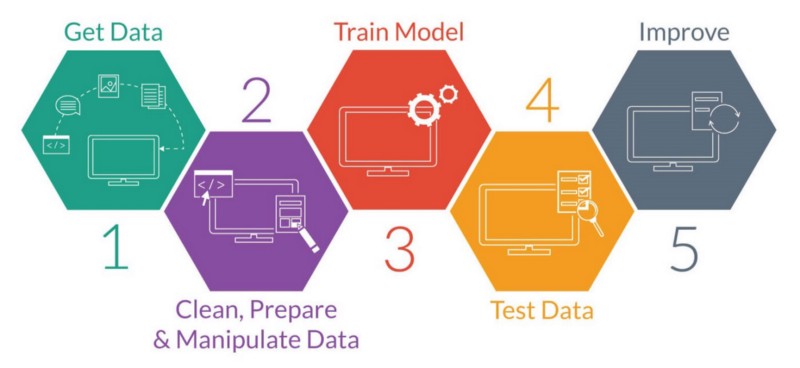
For the sake of this fast demo we will go fast through the steps with less details and processes than what it actually takes in real world project. Get your Jupyter notebook up and follow the next steps.
1- Getting the Data.
The dataset we gonna use here is from here but I cannot access that no more so you can get it from kaggle. The dataset from kaggle is in comma separated values format (CSV) whereas the version I have is in txt file. The dataset has 7 columns:
- buying price.
- maintenance cost.
- number of doors.
- number of persons.
- lug_boot.
- safety.
- traget or decision column.
Basically these features describing the car condition and the last column gives a category if the car is unacceptable, acceptable, good, very good. And in this problem we are trying to build a model that can predict the decision of new data as one fo the four categorise.
Reading the data
First we read the data into pandas data frame:
data = pd.read_csv(‘car.data.txt’, names=[‘Buying’, ‘Maint’,’doors’, ‘persons’,’lug-boot’,’safety’,’target’])
data.head()
I named the columns as my txt file has no headers but if you have the kaggle version of the dataset then you will see the headers available and therefore there will be no need for the names parameter.
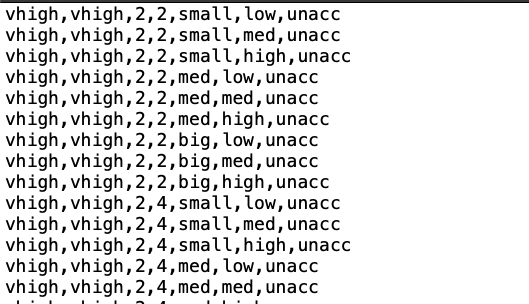
this how the data looks like from the txt file
Reading the data into pandas dataframe will present them in tabular format:
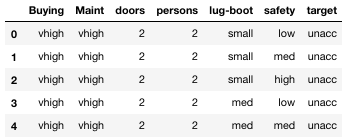
looks better in tables
Pre-processing
As you can observe from the table most of the values are categorise and machine learning models expect numeric data as an input to train the model. So, you will have to transform each column into a numerically encoded values. There are multiple ways to do that using scikit learn methods, but here just for demo purpose I will code my own simple way as follow:
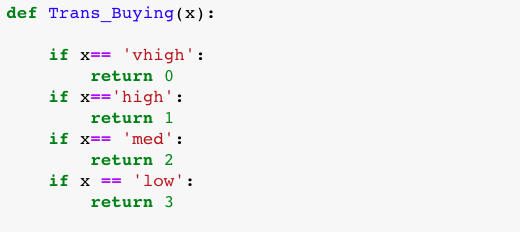
I have created one for each column
As you see the function is simple and it caters for each case. Definitely this way has issues but just to clarify the method for you. You can use any other method be it one-hot-encoding or label-encoder from scikit-learn. They do the same thing. We use the apply method to perform the Trans_Buying and you will have to use the apply method for each column to transform the columns.
data['Buying']=data['Buying'].apply(Trans_Buying)
After we are done with transforming all the columns into numeric data then we just need to split the data into training and testing.
# let's split data into training and testing
feature_columns = ['Buying', 'Maint','doors', 'persons','lug-boot','safety']
labels = data["target"].values
features = data[list(feature_columns)].values
X_train, X_test, y_train, y_test = train_test_split(features, labels, test_size=0.3, random_state=42)
Now that you data is ready to be fed into the algorithm for training you can try multiple algorithms to train. The algorithm with better performance can then be used for deployment.
Random Forest Classifier
RFC = RandomForestClassifier(random_state=101)
RFC.fit(X_train, y_train)
print("Score on the training set is: {:2}"
.format(RFC.score(X_train, y_train)))
print("Score on the test set is: {:.2}"
.format(RFC.score(X_test, y_test)))
Decision Tree Classifier
DTC = tree.DecisionTreeClassifier(criterion = 'entropy')
DTC.fit(X_train, y_train)
print("Score on the training set is: {:2}"
.format(DTC.score(X_train, y_train)))
print("Score on the test set is: {:.2}"
.format(DTC.score(X_test, y_test)))
Exporting the model
Now after you have trained supposedly multiple algorithms and you have done your performance analysis and decide in which model to take for production. But first we need to serialize the model / export it into a pickle file.
# Create persistent model
model_filename = 'carDTC.pkl'
print("Model exported to {}...".format(model_filename))
joblib.dump(DTC, model_filename)
To this stage you have already done with the machine learning workflow and next we need to create the Flask API. Flask is a web development framework from python. We will use it here to create an api for our model and we will deploy locally.
Flask API
Before you start in this phase please make sure you have isntalled Flask library. Then create a file in your favourite text editor and name this file filename.py
I use sublime and sometimes Atom feel free to use whatever you are comfortable with. Next we gonna create our Flask app and import some important libraries. Loading out serialised model that we have created before this.
# importing the libraries
from flask import Flask, request, jsonify
from sklearn.externals import joblib
#Creating our FlaskAPP
app = Flask(__name__)
# Load the model
MODEL = joblib.load('carDTC.pkl')
MODEL_LABELS = ['unacc', 'acc', 'vgood', 'good']
I have created a list of the classes I have because I will need them alter when the model present the prediction. In the next step we create the endpoint with predict function that is supposedly where we received the inputs and then make the predictions.
[@app](http://twitter.com/app "Twitter profile for @app").route('/predict')
def predict():
# Retrieve query parameters related to this request.
Buying = request.args.get('Buying')
Maint = request.args.get('Maint')
doors = request.args.get('doors')
persons = request.args.get('persons')
lug\_boot = request.args.get('lug\_boot')
safety = request.args.get('safety')
# Our model expects a list of records
features = [[Buying, Maint, doors, persons, lug_boot, safety]]
# predict the class and probability of the class
label_index = MODEL.predict(features)
# get the probabilities list for the prediction
label\_conf = MODEL.predict\_proba(features)
# list down each class with the probabilty value
probs = ' Unacceptable = {}, Acceptable = {}, Very Good = {}, Good = {}'.format(label_conf[0][0], label_conf[0][1], label_conf[0][2], label_conf[0][3])
# Retrieve the name of the predicted class
label = MODEL_LABELS[label_index[0]]
# Create a JSON and send a response
return jsonify(status='complete', label=label, confidence = ''.join(str(label_conf)), probabilities = probs)
Flask will handle the input data from the request and we just need to put these pieces of data into a list that has the same shape as expected by the model. Next step we feed the list to the model and we get the classification result in label_index and by that we try to get the class name from the model_labels for an added step here i tried to use predict_proba which is a method to retrieve the confidence of the model in the classification for each class. In the return function we get everything together using jsonify method to send the response to the API caller.
Congratulations you have a ready API built in flask just add the main function.
if __name__ == '__main__':
app.run(debug=True)
Now save that script and run it in from your terminal:
filename.py

your app is running in the address http://127.0.0.1:5000
Now to test your API you can make a call from your browser as follows:
http://127.0.0.1:5000/predict?Buying=1&Maint=1&doors=1&persons=1&lug_boot=1&safety=1
You can see how we list down the features with their values, order here is very important as the model expecting the features to be in the order as in training dataset.
You can also make a call from your jupyter notebook:
import requests
response = requests.get('http://127.0.0.1:5000/predict?Buying=1&Maint=1&doors=1&persons=1&lug_boot=1&safety=1')
print(response.text)

Response from the API
Now you have a simple API running smoothly of course scaling this to be provided to many users will be another task but before that there several aspects you should look at like error handling and later on versioning and CI/CD which are leveraging on software engineering techniques. Also you may want to provide this API in serverless lambda or whatever that suits your need or application.
Full source code with jupyter notebook can be found from here: Car Condition Evaluation. I remembered that I have gone through a similar code a while a go from someone in twoardsdatascience but I don’t remember the exact page so thanks to that person as well.