


Photo by Shubham Dhage on Unsplash
Getting the Most Out of MLOps with ZenML: 3
Creating efficient ML pipelines with ZenML: A step-by-step guide to building ML pipelines.


Intro
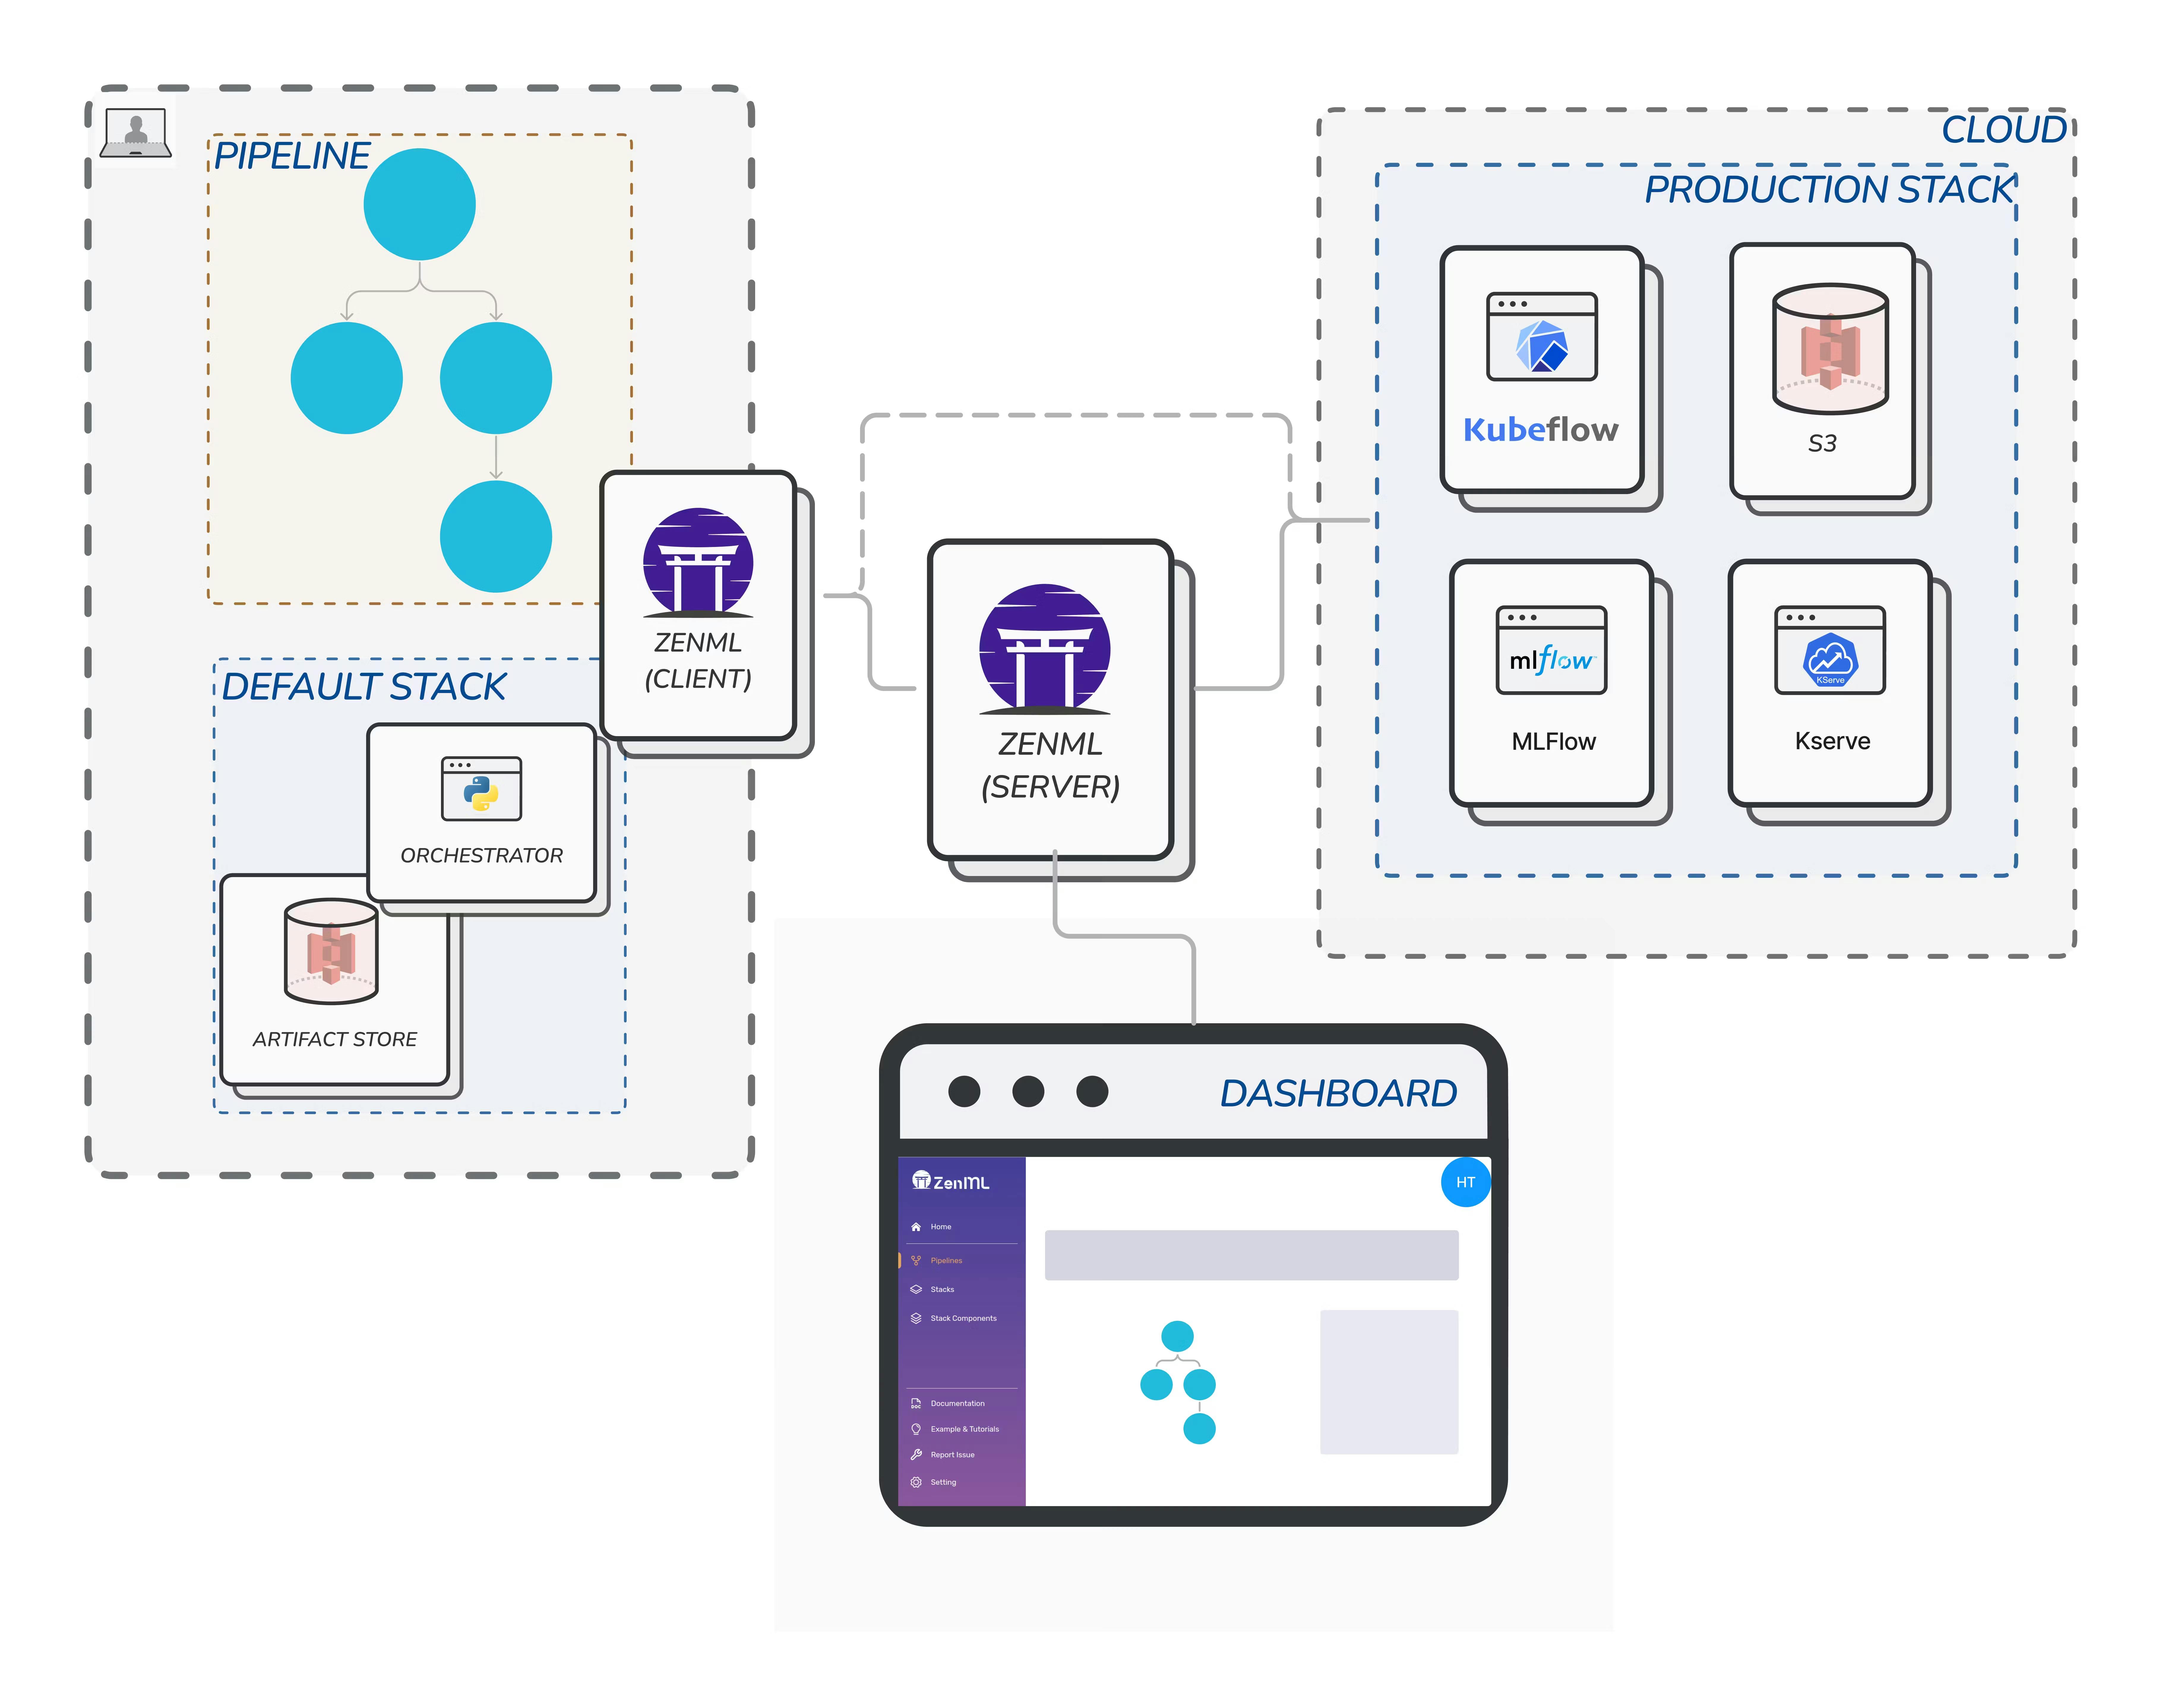
In the previous post, we have gone through deploying the ZenML server. The ZenML server is where we can view the dashboard and monitor our pipeline and previous runs with a nice visual graph representing the pipeline. Then we looked into using the CLI to connect to the server. In this post, we will create a simple pipeline and learn how to build pipelines in ZenML.
Pipelines
This is an intuitive concept for any data scientist working with ML. We sometimes call them workflows or DAGs if we adopt the Airflow terminology. In ZenML a pipeline is your ML workflow and is built from smaller blocks called steps.
Step
A step is the equivalent of a task, a function that does one thing. This approach allows you to build decoupled and modular components (read tasks) for your ML workflow (read pipeline). You are empowered then to write a portable and modular code once, and then moving from experimentation to production becomes frictionless.
"I choose ZenML to build beyond mere pipelines. With ZenML's modular approach, standardizing ML practices for your team becomes effortless. Enjoy simplified maintenance, streamlined development, and embrace software engineering concepts like test-driven development, portable code, and SOLID principles." -Fares Hasan
Fatty liver classification use-case
So let's build a use case to go through all the concepts and make them clear. If we want to build such a classifier we can think of typical steps that go like this:
Importing data
Preprocessing (handling duplicates, and missing data)
Train a model
They are steps and all of them together make up our pipeline which we can build in zenml. We are keeping this simple but you get the idea. In some use-case, you might call this the training or modelling pipeline because all it does is train a model at the end. To implement and follow up with this part make sure you have the following:
create repository or directory to store the code
create a virtual environment (python version 3.7 or above)
installed zenml client with version identical to the zenml server version (version 0.35.1 used by this series of articles)
  # connect to zenml server:
  zenml connect --url=http://my-server-address:8080/ --username=default
Dataset
You can download the dataset from Kaggle here and we will use the nafld1 file which contains 17.5k rows and 10 columns. Here is a brief catalogue explaining the columns:
| Column | Defintion |
| id | subject identifier |
| age | age at entry to the study |
| male | 0=female, 1=male |
| weight | weight in kg |
| height | height in cm |
| bmi | body mass index |
| case.id | the id of the NAFLD case to whom this subject is matched |
| futime | time to death or last follow-up |
| status | 0= alive at last follow-up, 1=dead |
Steps
We mentioned above the plan for using 3 simple steps to manage to build a classifier for fatty liver detection. In the first step we want to import the data and in this case, our data should be just the CSV file we have downloaded from kaggle.
Importing data
This will be just a simple step that use pandas to read the CSV file and return a dataframe. The typical code will be like this:
def import_data():
     df = pd.read_csv("relative_path_to_file")
     return df
Now that's a simple Python function, to make this into a ZenML step we can you decorator so it looks more like this:
@step
def import_data():
     df = pd.read_csv("relative_path_to_file")
     return df
But that is not good enough we could improve it by using type annotation for inputs and outputs and we will have a beautiful function that looks better:
@step
def import_data() -> Output(dataset = pd.DataFrame):
     df = pd.read_csv("relative_path_to_file")
     return df
Now you have seen how we write the methods nicely I hope you keep it up that way with the rest of the steps we will code together. One thing to keep in mind is that when we code the steps we treat them as separate Python functions with annotated input and output. In a later phase, we stitch them back together in a pipeline.
Another thought that might come to your mind is how you arrange the steps. You can go about this in any way you want, in my implementation here I have all the steps in one Python module calling it for example fatty_liver_steps but that is more of a personal preference. You can see my project file structure here. My approach in this small demo project goes like this:
fatty_liver:
    pipelines:
        __init__.py
        nfld_pipeline.py
    steps:
        __init__.py
        nfld_steps.py

    nafdl1.csv
    nlfd_run.py
Notice where I placed the CSV file for ease of use, in real project you should be reading from a data source.
Preprocessing data
There are a few things that we can do to improve this dataset to simulate real-life scenarios. Here are the steps we will perform in the preprocessing phase:
Remove redundant columns like identifier columns for the case and etc.
Impute the missing values using KNNImputer
Return the labels and features
Our preprocessing step should look like this:
@step
def preprocess_data(dataset: pd.DataFrame) -> Output(features=np.ndarray, labels=pd.core.series.Series):
    # remove the redundant columns
    data = dataset.drop(['id', 'Unnamed: 0', 'case.id'], axis=1)
    labels = data.pop('status')

    # impute the missing values using the KNNImputer
    imputer = KNNImputer(n_neighbors=2, weights="uniform")
    imputer = imputer.fit(data)
    features = imputer.transform(data)

    return features, labels
Training models
In real-life scenarios Data Scientists run multiple experiments but in our little example here we will just train two classifiers and our training steps will take care of each model as follows:
Support Vector Classifier
@step
def training_SVC(features: np.ndarray, labels: pd.core.series.Series) -> SVC:
    x_train, x_test, y_train, y_test = train_test_split(
        features, labels, test_size=0.2)
    svc_model = SVC()
    svc_model.fit(x_train, y_train)

    y_pred = svc_model.predict(x_test)
    print(classification_report(y_test, y_pred))
    return svc_model
Decision Tree Classifier
@step
def training_dct(features: np.ndarray, labels: pd.core.series.Series) -> DecisionTreeClassifier:
    x_train, x_test, y_train, y_test = train_test_split(
        features, labels, test_size=0.2)
    dct_model = DecisionTreeClassifier()
    dct_model.fit(x_train, y_train)

    y_pred = dct_model.predict(x_test)
    print(classification_report(y_test, y_pred))
    return dct_model
Great now you must have all the steps for this fatty liver use-case in one module if you followed my approach. The fatty_liver_steps.py file should be as follows:
import numpy as np
import pandas as pd
from sklearn.svm import SVC
from zenml.steps import step, Output
from sklearn.impute import KNNImputer
from sklearn.tree import DecisionTreeClassifier
from sklearn.metrics import classification_report
from sklearn.model_selection import train_test_split


@step
def import_data() -> Output(dataset=pd.DataFrame):
    df = pd.read_csv("nafld1.csv")
    return df


@step
def preprocess_data(dataset: pd.DataFrame) -> Output(features=np.ndarray, labels=pd.core.series.Series):
    # remove the redundant columns
    data = dataset.drop(['id', 'Unnamed: 0', 'case.id'], axis=1)
    labels = data.pop('status')

    # impute the missing values using the KNNImputer
    imputer = KNNImputer(n_neighbors=2, weights="uniform")
    imputer = imputer.fit(data)
    features = imputer.transform(data)

    return features, labels


@step
def training_SVC(features: np.ndarray, labels: pd.core.series.Series) -> SVC:
    x_train, x_test, y_train, y_test = train_test_split(
        features, labels, test_size=0.2)
    svc_model = SVC()
    svc_model.fit(x_train, y_train)

    y_pred = svc_model.predict(x_test)
    print(classification_report(y_test, y_pred))
    return svc_model


@step
def training_dct(features: np.ndarray, labels: pd.core.series.Series) -> DecisionTreeClassifier:
    x_train, x_test, y_train, y_test = train_test_split(
        features, labels, test_size=0.2)
    dct_model = DecisionTreeClassifier()
    dct_model.fit(x_train, y_train)

    y_pred = dct_model.predict(x_test)
    print(classification_report(y_test, y_pred))
    return dct_model
Pipeline
This is an easy part, we have multiple steps and a pipeline is just a code that expresses what step is executed first and manages the dependency between steps. For example, if step A depends on a previous step to run. Our pipeline code is as simple as this:
from zenml.pipelines import pipeline


@pipeline
def training_nfld_model(import_data, preprocess_data, training_SVC, training_dct):
    """Training non-fatty liver classifier"""
    alldata = import_data()
    x, y = preprocess_data(alldata)
    svc = training_SVC(x, y)
    dct = training_dct(x, y)
In this pipeline, you see the execution flow takes shape and our project is almost complete. The next action is to create a simple run.py script just to execute the pipeline. It looks like a Python code you are familiar with but comes with more ZenML power and it looks like this:
from pipelines.nfld_pipeline import training_nfld_model
from steps.nfld_steps import (import_data, preprocess_data,
                              training_SVC, training_dct
                              )


def main():
    # init and run the nfdl classifier training pipeline
    run_nfdl_training = training_nfld_model(
        import_data=import_data(),
        preprocess_data=preprocess_data(),
        training_SVC=training_SVC(),
        training_dct=training_dct()
    )

    run_nfdl_training.run()


if __name__ == "__main__":
    main()
In simple words, this code is running a pipeline for training a classifier model using ZenML. Here's a breakdown of what's happening:
The code imports the necessary pipeline and step functions from the respective files.
The
main()function is defined, which will be the starting point of the program.Inside the
main()function:The
run_nfdl_trainingvariable is assigned the result of calling thetraining_nfld_modelpipeline function.The pipeline function takes several steps as arguments, such as importing data, preprocessing data, training Support Vector Classifier (SVC), and training Decision Tree Classifier (dct).
Each step is called as a function to create an instance of that step.
The pipeline function is then executed using the
run()method of therun_nfdl_trainingvariable.
Finally, the
main()function is called when the program is run.
Run
Running this pipeline works like running any Python module by simply using the command in the terminal:
python run.py
The output should look something similar like:
Registered pipeline training_nfld_model (version 5).
Running pipeline training_nfld_model on stack default (caching enabled)
Step import_data has started.
Using cached version of import_data.
Step preprocess_data has started.
Using cached version of preprocess_data.
Step training_SVC has started.
By default, the PandasMaterializer stores data as a .csv file. If you want to store data more efficiently, you can install pyarrow by running 'pip install pyarrow'. This will allow PandasMaterializer to automatically store the data as a .parquet file instead.....
Step training_SVC has finished in 0.799s.
Step training_dct has started.
By default, the PandasMaterializer stores data as a .csv file. If you want to store data more efficiently, you can install pyarrow by running 'pip install pyarrow'. This will allow PandasMaterializer to automatically store the data as a .parquet file instead......
Step training_dct has finished in 0.342s.
Pipeline run training_nfld_model-2023_05_21-13_53_59_355523 has finished in 4.035s......
Summary
In summary, ZenML steps are the individual components that perform specific tasks, while ZenML pipelines connect and orchestrate these steps to create ML workflows. By leveraging ZenML's step-based approach and pipeline structure, you can easily build and manage end-to-end ML workflows that are scalable, reproducible, and efficient. In the next post, we will look into the concept of Stack and how we create, operate and orchestrate our ML pipeline in an MLOps Stack.